Sunday, 8 December 2013

A productive day

A reasonably productive day today. Headed up to the puku and started to dismantle the interior further. I still needed to find where a couple of leaks were coming from and need to strip back all the rotten wall cladding to inspect the frame. I started by removing the seats. These are only held in be a couple of screw, but as with everything else, these would not budge. I've always found a sash knife to be my best friend when it comes to carefully removing panels. A couple of quick taps with the sash knife and the seats were out. I then turned my attention to the walls(or what's left of them). Again using the sash knife I carefully removed the wall cladding. I intend to use the delicate remains as a template, to save time when making the new panels.
Once removed I could then see the frame. What a delightful surprise! There was next to no rot! A couple of bits to repair but nothing major.

I then started to remove the ceiling panels, again being carefully not to damage them too much, as I will use them as templates. I got a not so nice surprise, as I removed one of the boards, as hiding in the roof was a huge wasps nest! Although dormant is still startled me quite a bit.
I always find it nice to see notes and markings left by the people who built the caravan. There's quite a few in this van, just going to show how much of it was original. One of them scratched onto the back of an aluminum panel looks like a four spoked steering wheel, whilst most of the others are just references or a craftsman initials.

With all the interior panels removed I have found the source of two of the leaks. Both of them are damaged areas of the fibreglass front panel. You can see one of the damaged areas in the photo below. It is right below the gutter spout. There is also I thin wooden strip between where the end panel and the roof join, that is quite rotten.  Interestingly later Cheltenhams duo not have this wooden strip and the two panels are joined directly to each other. I may look at altering this to the latter style to prevent the wood rotting again. 

The final job for the day, was to fit one of the new windows I made last week. I haven't sealed them as I will be taking them back out when it comes to painting.
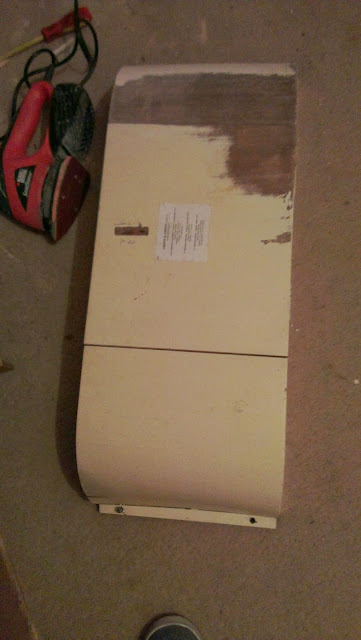
Back home, I decided it as time to take the plunge and see how much of the front pelmet/cupboard, was actually reusable. As I feared, it's pretty much all had it's day. The first clue, would have been it shedding bits of itself whenever I went near it. The only parts that are salvagable, are the battens that hold it together and maybe the end pieces. The end pieces are starting to delaminate but maybe be salvageable yet, with enough time and patience. I manage to persuade most of it to come apart with it losing its shape, or completely destroying any of it, so remaking a replacement should be a dodle. 
I will also be making up paper templates for it, as I've been asked for help by another Cheltenham owner. 

Friday, 6 December 2013

Rebuilding cupboards

The high level cupboards, both front and rear, are in a very poor state. At first glance, I thought the rear one would only need a couple of new bits and a good sanding back for the rest. On closer inspection, it turned out that pretty much all the plywood parts, were delaminating, apart from the sliding doors, which have been so vigorously sanded in the past, there's next to nothing left of the oak veneer. The only part still usable is the frame the the doors go in. 


The front cupboard/pelmet, literally fell apart as I took it down. For the amount of work it would take to salvage the very few useful bits from it, it's probably, going to be easier to start again.
Although I'm trying to retain the originality of the caravan, I do find this presents an opportunity to design in something more personal. Maybe putting frosted perspex sliding doors, instead of wooden ones. Putting in lighting in to the units etc. I'm going to get the basic cupboards done and then have a little play.

As the wood is very delicate, I have had to very carefully dismantle the cupboard, to keep the pieces together as much as possible, so I can use them as a template to cut new pieces. It will require both ends, top and bottom cutting from 6mm plywood and the back cutting from white faced hardboard. 

The frame sanded back really well to reveal beautifully grained oak, as with some of the other units. 

Wednesday, 4 December 2013

Repairing windows

One of the more important jobs in making the caravan water tight, is to replace the two broken windows. These are not as daunting as they may first seem but they are a little time consuming. First thing to do was remove the window cappings. Easier said than done. After 50 years the screws did not want to part company. As one of them was damaged already, the executive decision was taken to carefully prise the cappings off the screws. The enlarged holes can then be repaired before refitting.

With the capping out of the way I could now access the retaining screw that prevents the frame sliding out. As all the sealant had dried and cracked, I removed the complete hinge so it can be re-sealed. 

Once the windows had been removed the openings were temporarily boarded up. I also took the opportunity to check the frame around the windows. The offside was quite rotten but amazingly the near side was completely rot free!

The next step is to split the frame to remove the remains of the old glass and so the new pane can be slid in. The two parts are held together by four screws, two aside, that are hidden behind the rubber seal. These can quite often become seized and risk shearing. The best option is to soak them, over night in, penetrating oil and they usually come straight out. 

I will be using perspex instead of glass for the time being, for several reasons. Firstly because it's quicker to fit and I need to make a template for the glass anyway. Also there's less chance of it getting broken, whist I'm wielding timber around inside. 

Overlaying the frame over the perspex and drawing round the outside edge, gave the basic shape. Then it's just a case of measuring the inside recess, to get the right size, remembering to allow for the sealing rubber. 

Using a bit of washing up liquid as a lubricant, slide the pane with sealing rubber back into the frame. Once in, reassemble the top of the frame and push on the outer sealing rubber.

When I reinstall the windows, I will be resealing the hinges and the window cappings and that's the next job. 


Looking better

Well over the last couple of days I've been mainly working on one of the curved wall units and finishing the window pelmets.

As with pretty much everything in this van these had been painted white. The cupboard was also a lot more delicate than I'd previously realised. A lot of the veneer had to be glued back on. On other flatter panels it would have been easier to have replaced with new ply. 

With all the veneer glued back together and paint removed it was time to varnish. I'm using a varnish I've not tried before, a water based, satin varnish by Ronseal. This is quick drying varnish, touch dry in 20 minutes and re-paintable in an hour. This goes on milky but dries clear. This combined with great coverage and being able to just rinse your brush under a tap, makes it very easy to use.

An inspection of the other high level cupboards, has revealed that they are going to need considerable more work and the front over window may need completely building from scratch.

Saturday, 30 November 2013

A bit of Paint removal

I've taken a few of the smaller items out of the caravan, so I can work on them whenever I've got a few minutes free. A lot of the interior fittings have been painted white, so I want to strip these back. So far, touch wood, they're cleaning up well. The ceiling light revealed brilliant chrome and the pelmets have wonderful quarter sawn oak grain. Let's hope the rest clean up as well

Friday, 29 November 2013

Making a start

So first things first. I need to make it water tight. Apart from around the obvious broken windows there seemed to be a lot damp. There are a few holes in the rear fibre glass panel and where the tail light should be. I have gaffa taped these as a temporary measure until I can get them fixed.
There is also water getting in from the front where the roof and front panel join. Unlike later models, this has a thin strip of wood between the 2 panels which has nearly all rotted away.
At a guess, at some point it has had a log burner in it and a chimney has been put in the roof. This will need to be removed but at the moment it has had an old pan lid jammed over it, so it isn't leaking.
That done it as time to make a start on assessing the condition of the frame. It will require the bottom rail replacing full length down each side. As you would imagine the frame had rotted around the 2 broken windows. When I stripped back the test of the ply at the front of the caravan, I was surprised to see that most of the frame behind seems to be in good condition.
Another surprise, was the condition of the chassis. Considering it's 50years old and had spent much of it's time abandoned in a field, the chassis is in great condition! Better than the one on my sable, that I had to do extensive repair to. It will need the corner steadies repairing as the front 2 are badly bent and one of the rear ones has got pulled off. This was from when it was moved from the field with them still down.

A fun journey

So that leads on to its new start with me. Having scrutinised the pictures thoroughly on the eBay posting and spoken to the owner I decided to take a gamble and put a bid on it. The pictures showed in a shocking state and I began to wondered if it would make it back. A week later with the car fully stocked with spares, tools and my friend Joe (who at this point had no idea where we were going or for what) we made the journey up to Scotland to pick it up. When we got there we were greeted by the friendly owner who was more than happy to help us ready the van for its journey. Having checked the structure for weaknesses and deemed it to be better than I thought it would be, we set about fitting new tyres, lights, safety beak away cable and ensuring that everything was greased and that the brakes were working whilst a slightly bemused Joe looked on in dismay. Plastic sheeting was fastened over the two broken windows and the rear door tied shut as it hadn't got a catch. The final checks done we were ready to set off.

Setting off and getting going it handled brilliantly which came as a pleasant surprise. We headed down the A68 which gave us chance to see snow on the tops as we crossed the border back into England. After 170 odd miles and many funny and confused looks later, we arrived back home in Leeds safe and sound. 

welcome

Hi and welcome to my blog. I enjoy taking tired old caravans, like this Puku and giving them a new lease of life. I always aim to restore them sympathetically, retaining as many original features as possible, at the same time modernising it to make it more comfortable to use.

I also own a 1967 Cheltenham Sable that I had the pleasure of restoring some years ago. Although not in the same state as this Puku, it was suffering with quite a bit of hidden rot. It had repairs to the frame, the walls re-boarded, all cupboards stripped and varnished, re-upholstered and the electrics and gas bought up to modern standards.


Over the coming months and probably longer, I will be restoring a 1963 Cheltenham Puku 2.

This caravan has lead an interesting life. Since 1981 it has lived and been used on a farm, in the Scottish borders, as a site office and lambing caravan. Before moving to the farm, it was used as a caravan mission, touring Scotland and attending various events. The sign writing from this can still just about be made out down one side of the caravan. 

The puku had lived out in the fields for a few years before it was put up for sale and had got into quite a state. The previous owner, Al sent me a couple of pictures of how he found it in the field.


A good pressure wash later and it was looking slightly more presentable.